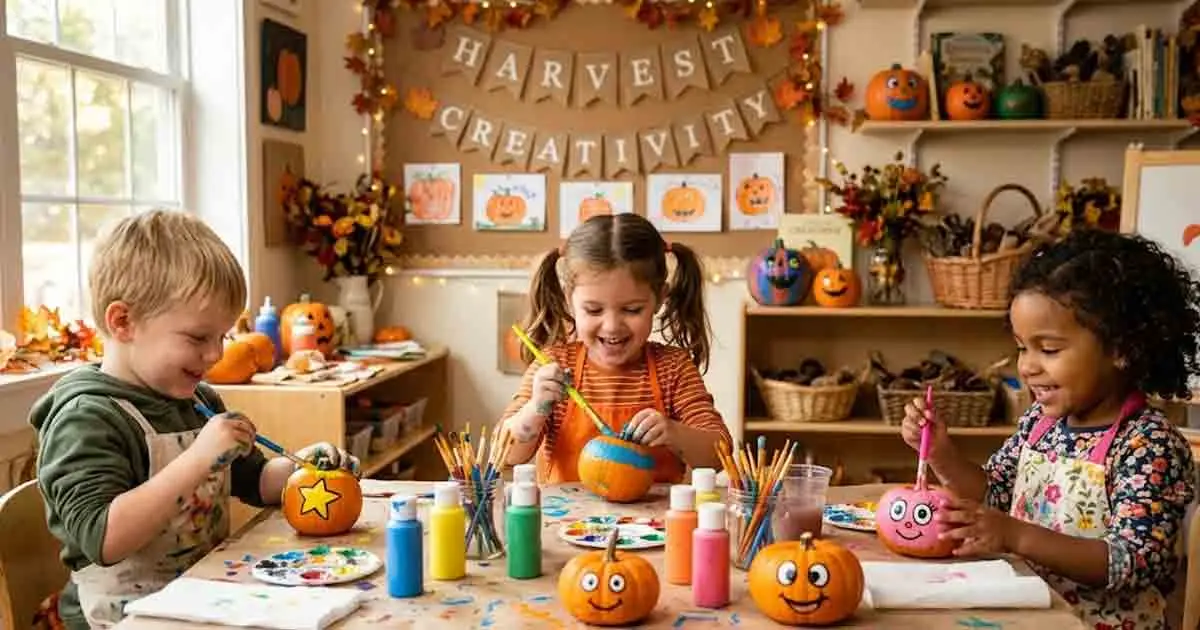
Pumpkin crafts for preschool are one of the most versatile and developmentally appropriate activities of the fall season. When they are at their best, they are a fine motor activity, sensory activity, colour recognition and seasonal learning all rolled into one that children really enjoy! The crafts in this guide are grouped by skill focus, by material category, and are suitable for children ages 3-5, and are available in most preschool classrooms or home craft drawers. They can be done in one session and can be tailored to varying levels of ability with little preparation.
Key Takeaways
- Pumpkin crafts for preschool are a combination of seasonal creativity and fine motor skills, sensory awareness, color recognition, and early literacy!
- The most simple preschool pumpkin crafts will need minimal preparation and common items: paper plates, orange paint, construction paper, glue and googly eyes.
- Ideal pumpkin activities for ages 3-5 are pumpkin stamping, paper plate pumpkins, tearing art, fingerprint pumpkins, and pom-pom collages.
- One of the most sensory and developmentally appropriate activities is to stamp with a real pumpkin cut in half and dipped in paint.
- The crafts listed here can be used in a classroom center, small group or home table without any specialist equipment.
- Counting seeds, talking about texture, and labeling shapes are all natural pumpkin science, math, and literacy activities.
Why Pumpkin Crafts Work Well for Preschoolers
Little Learning Corner says that pumpkin crafts help develop fine motor skills by cutting, tearing, gluing and painting. They learn about texture by exploring materials, they learn to recognise colours with materials of orange, green and yellow, and they have a natural link to autumn science topics such as plant life cycles, counting seeds and seasonal change.
The pumpkin shape is easy enough for young children to identify and copy for all kinds of art techniques. Most four year olds are able to draw a circle with a stem and younger children can explore the shape of a pumpkin using painting, stamping and collage without having to draw the shape themselves.
Early Learning Ideas says all pumpkin projects for preschoolers should include some fine motor skills, such as cutting, tearing, hole punching or tracing. The activities below are organized according to this principle. Each craft is chosen for more than its finished appearance, but for the skill practiced in that craft.
Preschool Pumpkin Crafts using paper
1. Paper Plate Pumpkin
Materials: Paper plate (Orange or White); Orange paint; Black construction paper; Green paper strip for stem; Glue.
Method: If using a white paper plate, paint it orange and allow it to dry. Cut out simple eyes, nose and jagged mouth from black construction paper. Attach these to the painted plate to make a jack-o-lantern face. Attach a green paper strip to the top as a stem.
Skill area: Colour use, accuracy of gluing, organisation of facial features in space.
Across Fun-A-Day and Rock Painting Guide this is one of the most recommended first pumpkin crafts for preschool, and is considered a good beginning point due to its familiar format and simplicity of materials. Kids who made paper plate crafts before will feel confident in doing this one.
2. Pumpkin Tear Art
Materials: Orange tissue paper or construction paper, pumpkin outline on white card (printed or drawn), glue stick.
Method: Orange tissue paper or construction paper, scissors. Glue inside the outline and press the torn pieces to the glue to fill the outline. Add a green stem with torn up green paper.
Learning objective: Skill focus is fine motor control using the tearing, hand-eye coordination and shape recognition.
Little Learning Corner says pumpkin tear art is a “no prep” activity that helps with fine motor control, and is a great activity for children who are still learning how to use scissors. The “tearing” motion reinforces the same hand muscles involved in using scissors and in early writing. Pre-cutting paper into strips helps children with less hand strength to tear and helps younger preschoolers not to get frustrated.
3. Cutting Paper Pumpkin Folded
Materials: Orange construction paper, scissors, green marker or paper for stem.
Method: 1 sheet of orange paper.Method: Take one piece of orange paper and fold it in half. Fold along the edge of the half pumpkin shape. Children use a cut to make a line on the paper, but the paper is folded. The symmetrical shape of the pumpkin is exposed when opened. Early Learning Ideas says the unveiling of the paper is magic and always elicits real joy.
Skill focus: scissors, two lines of symmetry, line following.Skill: Scissor control, symmetry concept, line following.
Children are challenged to maintain the paper folded while they are cutting which is a challenge for older preschoolers with some experience cutting with scissors.
4. Pumpkin Collage with Orange Pom-Poms
Materials: Pumpkin outline template, orange pom poms or cotton balls, glue, green paper stem.
Method: Card and pumpkin outline.Method: Print or draw a pumpkin outline on card. Glue inside the outline and stick orange pom-poms or cotton balls on top of the glue to fill in the shape. For a jack-o-lantern effect, add googly eyes.
Skill focus: Picking up and placing pom-poms, filling a bounded shape, texture experience, using a pincer grip.
Based on Little Learning Corner, this craft is ideal for toddlers and younger preschoolers since it doesn’t involve paint drying and is mess-free, so it can be used at the end of a session or for a craft center.
Preschool Pumpkin Crafts with Paint
5. Pumpkin Stamping with a Real Pumpkin
Materials: Small pumpkin or apple cut in half, orange tempera paint in shallow tray, white paper.
Method: Paint in a shallow tray or on a foam plate with orange paint. Stamp the cut face of the pumpkin or apple into the paint and then stamp it onto white paper to make a pumpkin print. Repeat to make a pumpkin patch arrangement. Use black marker to add jack-o-lantern faces when dry.
Skill focus: Exploring texture, printing, cause and effect.
Little Bins for Little Hands suggests that children can decorate and paint paper plates to resemble pumpkins or create pumpkin prints by cutting the halves of pumpkins and dipping them in paint. Paper stamping cannot compare with the sensory aspect of real pumpkin stamping. The texture of the cut pumpkin, the aroma of the flesh and the organic irregularity of each print make it a more satisfying experience than a foam stamp.
6. Fingerprint Pumpkin Art
Materials: Orange and Green paint, White paper, Fine black marker.
Method: Finger, orange paint, paper.Activity: Press finger into orange paint to create a cluster of overlapping fingerprints on paper to make a round pumpkin shape. Let dry and add a face with a fine black marker, a green stem and curling vines. Leaves are made with extra fingerprints added to green paint.
Skill focus: Controlled finger pressure, spatial arrangement, using art media (paint and marker).
Fingerprint pumpkins are super easy, super cute, and great for quick art stations or bulletin boards, according to Early Learning Ideas. They don’t need any template or scissors, and are one of the easiest activities for the youngest preschoolers.
7. Pumpkin Caterpillar Print
Materials: Bubble wrap sheet, orange paint, outline of pumpkin on paper or card, green marker.
Method: Orange paint and a sponge or brush.Steps: Use the sponge or brush to paint on a sheet of bubble wrap. Stamp the painted bubble wrap into a pumpkin shape outline on paper. Cautiously lift to expose an orange dotted texture print. Stem and face when dry.
Skill focus: Knowledge of printmaking and its processes, exploration of texture, and the ability to press with control.
Little Bins for Little Hands states that bubble wrap is more than a squishy packing material that children enjoy popping. Children get a sense of achievement from using it as a printing tool, as the resulting prints are colorful and textured, and appear more complicated than they actually are.
8. Suncatcher Pumpkin
Materials: White coffee filter, washable orange and yellow markers, spray bottle of water, green pipe cleaner and tape.
Method: Paint coffee filter in patches with orange and yellow markers. Lightly spray with water and let colors bleed and blend. Allow to dry completely. Take a green pipe cleaner and twist it around the top to make a stem and hanging loop. Tape to a window.
Skill focus: Observation and understanding of color mixing, patience in two stages.
Little Learning Corner says that the coffee filter pumpkin crafts use colored water and let kids watch the water flow, making a suncatcher that glows orange when it is in the sun. This lag allows for the introduction of the concept of a process that takes time to complete.
Sensory and 3D Pumpkin Crafts for Preschool
9. Yarn-Wrapped Pumpkin
Materials: Orange yarn, toilet paper roll or cardboard shape, glue, green pipe cleaner stem.
Method: Glue a toilet paper roll or a cardboard pumpkin shape around a thick piece of cardboard. Wrap orange yarn around the form in a continuous manner until it is covered. Tuck in the end. Take one green pipe cleaner and twist into a spiral stem and place on the top.
Targeted skills: Bilateral hand coordination, sustained attention, fine motor control (wrapping).
Yarn-wrapped pumpkins are a firm favourite and a great fine motor skills project with lovely results, according to Red Ted Art. This craft is calming and repetitive, it is suitable for children who need sensory regulating activities. It also creates a three-dimensional product that children can manipulate and present, further strengthening their sense of ownership of the object.
10. Make Potato Masks
Materials: Air dry clay, orange paint (if using something other than orange clay), green pipe cleaner or twig to serve as the stem.
How to: Make a ball of clay. Using the pinch pot technique, press thumbs outward from center to create a bowl shape. Use a toothpick or blunt object to make ridges on the outside to create pumpkin ribs. Let dry, and then repaint with orange if necessary. Use a green pipe cleaner or small twig as a stem.
Skill focus: Hand strength, pinch grip, three dimensional spatial awareness, patience due to drying process.
Pumpkin pinch pots are a favourite of Red Ted Art and are a great look when filled with candycorn treats or nature finds. The clay work activates hand muscles which are directly linked to later writing readiness.
11. Pumpkin Sensory Bag
Materials: Ziplock bag, shaving cream or orange hair gel, small plastic pumpkins or orange pom-poms, tape.
Method: Fill a ziplock bag with orange gel and small objects. Tape and seal tightly on top for extra security. Children press, squish and move objects around in the bag without making any mess.
Sensory focus: Sensory exploration, cause and effect, bilateral hand use.
A sensory-rich pumpkin bag activity is a tactile activity that helps develop sensory skills and learn about a pumpkin theme, according to Rock Painting Guide. This craft is great for sensory seeking or messy materials because it gives sensory input without touching the materials.
Nature Based Pumpkin Crafts for Preschool
12. Leaf Pumpkin Collage
Materials: Fall leaves, orange, yellow, red, and pumpkin outline on paper, glue.
Activity: Go on a short nature walk with children to gather fallen leaves as they turn colors in the fall. When you get back to the table, cut or cut out the leaves within a pumpkin shape and glue them on. For a natural finish, add a twig stem.
Use of materials: Nature items, colors, walking to gluing.
A leaf pumpkin craft is the ideal fall and Halloween craft, and can be paired with a nature walk to bring the craft outdoors, according to Happy Toddler Playtime.
13. Rock Pumpkin Painting
Materials: Smooth rocks, orange and black paint, varnish or Mod Podge to seal.
Method: Paint rocks orange, and let them dry. Add jack-o-lantern faces with black paint (triangular eyes, nose and jagged or grinning mouth). When dry, seal with a coat of Mod Podge or child-safe varnish.
Focuses: Controlled brushwork on an irregular surface, planning a composition on a small area, delayed gratification through a two coat process.
Rock Painting Guide says it’s a great idea for kids of all ages to have fun and get creative by painting pumpkin designs on rocks, turning ordinary rocks into festive fall decorations. A rock has an irregular surface, and requires a different type of painting than flat paper, which develops adaptive fine motor control.
Taking Pumpkin Crafts to Learning Activities
Pumpkin crafts seamlessly extend into simple math activities with Little Bins for Little Hands, such as counting pumpkin seeds, comparing the sizes of pumpkins, and sorting pumpkins by attributes like color and size.
Extension: Once children have finished any craft, they can dictate or write a sentence about their pumpkin. According to Early Learning Ideas, using the simple sentence frame “My pumpkin is orange and round” is a good way to incorporate literacy and art.
Science extension: To start crafts, look at a real pumpkin with children. Invite them to use sensory words to talk about the outside: rough, bumpy, ribbed, orange, heavy. Cut the pumpkin open and examine the seeds and flesh. Count seeds together. Talk about the growth of pumpkins from seed. This investigation helps to support the crafts and to provide an introduction to direct observation.
Math extension: Organize the pumpkins by size, smallest to largest. Count the ridges of various pumpkins and compare. Use a balance scale to weigh pumpkins.
The idea of using art in structured observation and learning is linked to community art projects which incorporate visual making as a means of gaining a wider understanding. This is the same concept as the tradition explored in the guide to Day of the Dead artwork, where creating a physical object is a part of the passing on of cultural knowledge and community values across generations.
Materials List Preschool Pumpkin Crafts
The materials are common to most of the crafts in this guide. Pre-stocking these items prior to the session will help to streamline set-up and help children transition to different activities with less downtime.
| Material | Used In |
| Paper plates (orange or white) | Paper plate pumpkin, wreath |
| Orange tempera paint | Stamping, fingerprint, bubble wrap print |
| Black construction paper | Jack-o-lantern features |
| Orange tissue paper | Tear art, suncatcher |
| Pom-poms (orange) | Collage, sensory |
| Googly eyes | Paper plate pumpkin, no-carve pumpkin |
| Coffee filters | Suncatcher |
| Orange yarn | Yarn-wrapped pumpkin |
| Air-dry clay | Pinch pot |
| Smooth rocks | Rock painting |
| Collected leaves | Leaf collage |
| Glue sticks and liquid glue | All paper crafts |
| Green pipe cleaners | Stems for multiple crafts |
One of the principles used with any craft project is to have the correct materials ready before starting. The material quality is as important to the outcome as the technique, as the product guide to the American Crafts album Grape Soda demonstrates, and in this book, they are the bedrock of a long-lasting and rewarding result.
The following are some tips for using pumpkin crafts in the preschool classroom
Prepare in stages. Consider using one or two crafts at a time as center rotations instead of trying to do all crafts at once with the whole class. This decreases time waiting and provides more adult attention during the craft.
Pre-cut where needed. If children are younger or have poor scissor skills, pre-cut stems, facial features, and shapes will help them concentrate on gluing and positioning rather than using scissors.
Allow drying time between stages. If the craft is multi-stage using paint, allow at least 15 to 20 minutes for the first stage to dry before adding another stage or layer. If wet paint is handled too early, it will leave smears that will upset children.
Document the process. Take photos of children throughout their craft, not just the final product. The process of making a product is more informative for developmental assessment than the product itself, and provides a more complete picture of how involved their child is for families.
Accept variation. There is no right or wrong answer to preschool crafts. A pumpkin tear art piece with a light application and some pieces dangling off the edge is just as effective as a heavily filled piece. Skill practice takes place during the doing, not the matching of a model.
Conclusion
Pumpkin crafts for preschool are most useful when selected with a purpose for development. The thirteen activities in this guide span a variety of materials, techniques, and skill focuses and address the areas of fine motor development, sensory exploration, creative expression, and early STEM connections. All of them require no specialist equipment or advance preparation.
The best way to use pumpkin crafts is to think of them not as seasonal decorations, but as learning opportunities, where the process of creating the pumpkin is as important as the pumpkin itself. Selecting a craft that focuses on a particular skill, giving children the right materials and giving them enough time to work at their own rate has better developmental outcomes than haste to make something that is ready to display.
When pumpkin art is paired with science exploration, pumpkin seed counting and sensory description, families and educators can have a more meaningful and cohesive learning experience that is more than just a fall activity.
To learn more about creative activities, art education and learning through making, check out the full spectrum of content at Shani Levni.
Frequently Asked Questions
What pumpkin projects can be done with preschoolers (ages 3-4)?
Children ages 3-4 are best suited to glue, press and stamp pumpkin crafts using the scissors as an optional tool. Paper plate pumpkins with cut out features, pom-pom collages, fingerprint art, pumpkin stamping using a real pumpkin and sensory bags are all appropriate for this age group. Tear art is also suitable, especially if the paper has been pre-torn into strips so that it is easier to tear.
What is the best way to decorate your pumpkin?
Most preschool pumpkin crafts require orange paint, paper plates, orange and green construction paper, glue sticks, black construction paper or black markers, googly eyes and pom-poms. Coffee filters, air-dry clay, smooth rocks, yarn and bubble wrap are optional extras. Most materials can be purchased at dollar stores or at basic craft stores.
What are the benefits of pumpkin crafts for children?
Pumpkin crafts help develop fine motor skills by cutting, tearing, gluing and painting. They develop sensory awareness by exploring the real pumpkins, clay and yarn. They learn to recognize colors, arrange things in space, and learn about shapes. They also relate to early literacy by labelling and describing, as well as to math by counting and sorting seeds by size.
Do you have to use paint for pumpkin crafts?
Yes. Numerous pumpkin crafts for preschool do not involve any paints. For places where cleanup time or mess is a concern, tear art, pom-pom collage, yarn-wrapped pumpkins, leaf collages and sensory bags are all paint-free options.
What is the time required to finish the preschool pumpkin crafts?
Most pumpkin crafts for preschoolers are between 15-30 minutes to make, not counting drying time. Multi-stage crafts that involve painting, like coffee filter suncatchers or rock painting, will need more drying time between steps. Most of these activities can be expected to take 45 minutes, including set-up, the craft itself and clean-up.
Can pumpkin crafts be considered for children with sensory sensitivities?
Yes, with adaptation. Children can do pumpkin stamping with a brush and paint, rather than hand contact; they can make pom-pom collage with a glue stick instead of a liquid glue; they can make sensory bags instead of using direct contact with clay or paint. The different kinds of crafts included in this guide will allow children with varying sensory sensitivities to enjoy age-appropriate pumpkin crafts.